Red
Lion Precision, LLC - #R12A Installation Instructions
Sub2000
Gen2 Replacement Flip-Up Front Sight
(Use
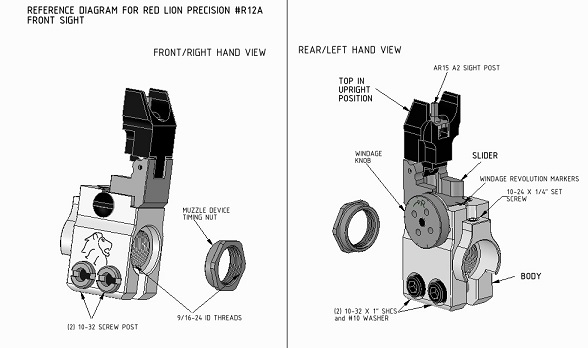
with Reference Diagram For Red Lion Precision #R12A Front sight)
-Tools Needed: 5/32 Allen Wrench, 3/32 Allen Wrench, & Large Flathead Screwdriver
1. Make sure
that magazine is removed and firearm is unloaded. Please be sure to follow all safety
procedures when handling firearms.
2. Remove
factory front sight by following the instructions provided by Kel-Tec via their
Sub2000 Gen2 Safety, Instruction, and Parts Manual. See Kel-Tec’s website for PDF download if you
don’t have the Sub2000 Gen2 Safety, Instruction, and Parts Manual.
3. Make sure
muzzle threads are clean and set screw is not protruding into ID of #R12 Front Sight. Screw the #R12 Front Sight onto the 9/16-24 threads with end with set screw toward the receiver until it
bottoms out. Back off just enough to
achieve approximate proper position radially (will be less than one revolution).
4. Tighten
down both 10-32 screws using a 5/32” allen wrench and a large flat head screw
driver in the screw post slot so that the front sight is snug but can still be
positioned radially by hand. Once
positioned correctly radially, tighten both 10-32 screws to 5-6 ft/lbs.
5. Flip top of sight up if not already done so for
allen wrench access and then snug down 10-24 set screw using a 3/32” allen
wrench.
6. Installing Timing Nut.-Care should be taken to keep supplied wrench on hex of Timing Nut.
-If a
muzzle device is not being used, just finger tighten Timing Nut against
front sight with hex flange facing toward muzzle and reinstall factory thread
protector that was removed previously.
Timing nut can be held with supplied 11/16” wrench while tightening
thread protector.
-If a
muzzle device is being used, then finger tighten Timing Nut against
front sight with hex flange facing toward muzzle. Thread on muzzle device until it bottoms out
on Timing Nut, then if muzzle device is not oriented correctly radially, back
off muzzle device until proper radial orientation is achieved and then back off
Timing Nut until it bottoms out on muzzle device. Hold Timing Nut with supplied 11/16” wrench
while tightening down muzzle device to muzzle device torque
recommendations. (ATTENTION: Kel-Tec specifies 10 ft/lbs MAX)
7. Installation should now be complete.
To adjust windage place the sight tool (included) in
the 4 holes on the face of the windage knob or use a dime on the opposite side
in windage screw head. Windage knob is
marked for bullet impact adjustment direction.
Elevation is a standard AR15 A2 sight post, place sight tool in the 4
half moons of the sight post and depress the detent to turn the post. Turn clockwise to raise bullet impact and
counter clockwise to lower bullet impact.
Each windage click is .67” @ 100 yards.
Each elevation click is 1.72” @ 100 yards.
