Installation Instructions For #R8Tools required: 5/32" allen wrench, 3/32" allen wrench, 1/8" allen wrench and a flathead screwdriver (torque wrench recommended)
1. Make sure magazine is removed and chamber is empty.
2. If not already done the front sight must be removed for install.

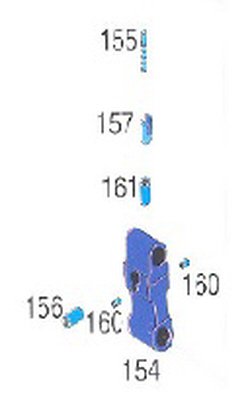
-Remove 2 set screws (diag #160) located on the sides of the front sight body(diag #154) with a 3/32” allen wrench.
-Use factory tool that came with SUB9 rifle or a thin nosed set of needle nose pliers(like we did) to remove the front sight post (diag #155) thru hole in top of front sight body.
-Remove the windage barrel (diag # 156) from front sight body with rod smaller than the windage barrel such as a punch or the back of a pen. Should slide out the side of the front sight body with a little pressure.
-Screw front sight post a few threads back into the plastic insert (diag #157) that is now exposed from top and use the front sight post to pull out the plastic insert.
-With a 5/32” allen wrench back off or remove the set screw (diag #161) that is now exposed from the top of the front sight body.
-The front sight body may or may not require some heat to break the adhesive that helps to hold it in place. Heat gun is recommended if it does require heat since an open flame may discolor barrel if touched directly. Front sight body should slide off the end of the barrel.
2.Slide adapter onto the gun (non-muzzlecomp adapters go longer solid circumference end first) about 1.5".
3.Orient so that the longitude (parallel to the barrel) milled slot is at 6 o'clock on the barrel. Place the sight body over the adapter and orient so that the radial milled slots are evenly revealed in front of and behind of sight body (This should place your sight close to the right position length wise on the barrel for folding and locking). Snug clamping screws till everything is snug but can still be moved around. Then fold the Sub 9 to set the sight and adapter at a good position for detent engagement.
4. Then unfold the Sub 9 to get your sight lined up close radially so less drastic windage adjustments will be needed, its best to have a red dot sight mounted to line it up with and then tighten clamping screws to 6 ft/lbs. Lining up with a laser bore sighter should work as well. If not using these eyeballing should be fine, if off more than you want to compensate with windage just reset.
To adjust the windage place the sight tool (included) in the 4 holes on the face of the windage knob or use dime on the opposite side in windage screw head. Windage knob is marked for bullet impact adjustment direction. Elevation is standard AR15 A2 sight post, place sight tool in the 4 half moons of the sight post and depress the detent to turn the post. Turn clockwise to raise bullet impact and counter clockwise to lower bullet impact. Each windage click is .67" @ 100 yards. Each elevation click is 1.72" @ 100 yards.